There are two steps to learning about microscopes. First, you should know the names of the parts of the microscope, and second you should know how to focus appropriately.
I'll see if I can make learning the parts of a microscope fairly painless.
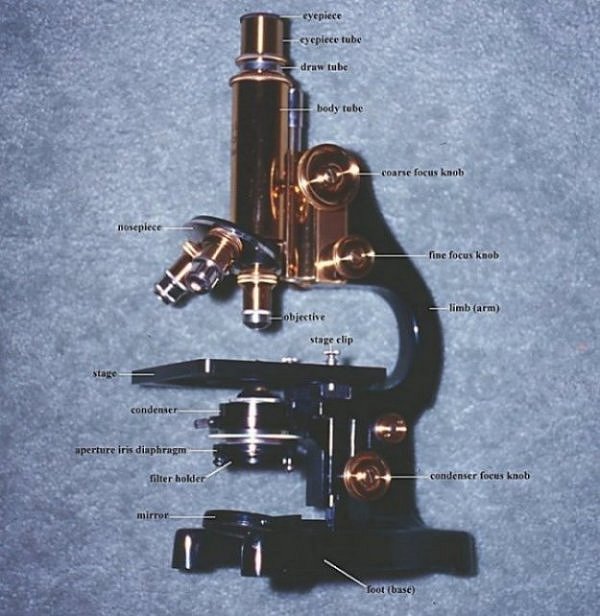
Let's start with a picture of a microscope.
EYEPIECE
 The eyepiece is the piece where you stick your eye. It may have names like "eyepiece lens" or "occular lens," but it's basically all the same. You'll notice on the eyepiece a number such as 10X or 4X. This is the magnification power of the eyepiece lens. To get total magnification, multiply the magnification of the eyepiece by the magnification of the objective lens. For example, if the eyepiece read 10X and the objective lens read 15X, your total magnification would be 10 times 15 or 150 times larger than normal. That would be written as 150X.
EYEPIECE TUBE
The tube part of the eyepiece lens. See EYEPIECE.
DRAW TUBE
Not always present in microscopes. This could be adjusted to fix problems with the lens. Don't worry about this term.
BODY TUBE
 This is the main tube of the microscope, and light passes through here from the light source, through the stage. The light is then focused onto the eyepiece. The length of the body tube often effects the magnifying power of the scope.
COARSE FOCUS KNOB
 This large knob is used first to get the image roughly into focus. It works by moving the body tube up and down a large distance. It should only be used on the lowest power because its movements are so great.
FINE FOCUS KNOB
 The fine focus knob is the smaller knob. It works by moving the body tube up and down a very small distance. When the object is roughly in focus (using the coarse focus knob), details may be revealed through use of the fine focus knob. It brings the image into the best clarity. Because it only moves the body tube small distances, it can be used on high powers.
ARM (LIMB)
 Although you can call this the limb of the microscope, please don't. Call it the arm. It just makes more sense. The arm is a sturdy part of the scope which connects the moveable body tube with the stage and the solid base. It is meant for support. Always remember, when carrying microscopes, wrap one hand tightly around the arm.
CONDENSER FOCUS KNOB
This is not found on all scopes. This knob focuses the light which comes up through the stage.
FOOT (BASE)
 Like your feet, the foot of the microscope is what it stands on. The base must be a very study substance to hold the rest of the scope. Often, the base will have the cord attached and it will house the light source. You may call this part either the base or the foot. I really don't care which. Just remember that if you're putting the microscope away, one hand goes firmly under the base. Watch out though. Often the light source will become hot if used for a long time.
LIGHT SOURCE (Mirror or light)
 Before electricity, it was hard to get microscopes lighted. The first microscopes used sunlight alone, but the sun isn't stationary in the sky. To get enough light, you had to find a way to get the light to pass through the specimen. Eventually, mirrors were used. These became standard on microscopes. When electricity became available for use with microscopy, lights were installed. Usually, the light source is located under the stage, but for some microscopes, it may be elsewhere.
FILTER HOLDER
This is not on all microscopes. Some things are easier to see through filtered or colored light. The filter holder would hold the filter in place.
IRIS DIAPHRAGM (APERATURE)
 The iris diaphragm is names after the iris (colored part) of your eye. IF the light is too bright, the iris will constrict, making the pupil small. This way, less light will get in. If you go into a dark room, the iris will relax, making the pupil large, collecting as much light as possible. On a microscope, light is controlled with the iris diaphragm. If the image is dim, let more light through. If you're going blind from the brightness, close the iris.
CONDENSER
The condenser is a mirror or lens used to concentrate the light passing through the microscope.
STAGE
 Shakespeare said that all the world's a stage, but on a microscope, only part of it is. A stage is where all the action is. That's true of microscopes too. The stage is where slides are placed. It's where the organisms are, the light is focused, and where you're gaze is fixed. The stage is where it's happening.
STAGE CLIP
 Just like a paper clip, a stage clip has the job of holding things in place. Stage clips are little metal pieces which hold slides firmly in place. They're handy, and I highly recommend using them, especially when tilting the scope.
OBJECTIVE LENS
 Most standard microscopes will have several objective lenses. Remember, the objective lens is the lens pointed at the object, such as the ant in the picture. The lenses pictures have numbers on them. 4X referrs to the ability to magnify the object four times its original size. If you usse a 4x objective lens, and a 10x eyepiece lens (occular lens) you have a total magnification of 4 times 10, or a total magnification of 40. Most often, the longer the lens, the higher the magnification.
NOSEPIECE
 The nosepiece is what holds the objective lenses. Most nosepieces can be turned so that the desired lense is pointed at the specimen. Some nosepieces have only two attached lenses, but there are some microscopes with as many as fifteen! Three is pretty standard for your typical nosepiece.
| How | Why | |
|---|---|---|
| FOCUSING | ||
LOW POWER:
|
| |
| Do not touch the coarse adjustment on medium or high power! | Coarse adjustment + high power = broken slides. | |
MEDIUM POWER:
|
| |
|
HIGH POWER: Repeat the exact same steps as with medium power using the high power objective lens. | Be most careful on high power. It's most sensitive. | |
| TROUBLE SHOOTING | ||
THE FIELD IS BLACK
|
| |
THE OBJECT DOES NOT LOOK CLEAR
|
| |